Wednesday, January 28, 2015

Details...

I've been busy lately working on several projects around the house - mainly finishing touches in the guest room and master bedroom. Before Christmas, I found a beautiful roll of gold and white paper that I immediately thought would be perfect to highlight my grandparents' buffet in the basement guest room. I had this brilliant plan to measure and cut poster board to fit behind the shelves, and glue the fancy paper to it, and then mount it with removable tape. Except when I got home, I found out that instead of a roll of paper, it was two smaller sheets that would hardly be enough. I was disappointed. But I soon came up with plan B, which was a gold sharpie and a ruler. I decided to use the posterboard and just hand draw a herringbone pattern on it. It turned out better than I expected.

Here's the posterboard, halfway through drawing. It took awhile.


Here's the hutch before. Pretty, but too much wood paneling.


Here's the hutch after mounting the posterboard. I think it adds the perfect amount of visual interest, and brightens things up immensely.


Close-up of the shelving.


I'm not sure why this picture turned out so blurry, but it's nice to have a more finished set-up.


Now, for the bedroom! After painting and hanging frames on the accent wall above the headboard, I haven't made much progress. There were still a lot of blank spaces on the walls that needed to be filled, but I was out of ideas. Eventually I saw this (and similar ideas) on Pinterest, and thought it would be fun to try making a painting for our bedroom that would help tie-in the color scheme.


I thought I'd had enough of the chevron/herringbone pattern for awhile, so to mix things up, I used 1/8" wide painters tape to create a brick wall pattern on my canvas. The canvas is 24"x36" so as to fit perfectly above Jamey's dresser. 

I dived right into the project and forgot to take pictures until this point. I bought navy, teal, gold, and tan acrylic paint, and used some leftover blue wall paint so it would match. Then I just sort of painted random splotches with a 2" wide brush, and blended the colors while they were still wet. (I should note that I painted over the tape first with white paint and let it dry so I would get clean lines with no color bleeding.)


When finished, I just peeled off the tape. Voila! 


Once it dried, I hung it above Jamey's dresser. 


I found this clock at Hobby Lobby for half off, and it was too pretty to pass up. Jamey kept telling me he wanted a clock in the bedroom that was big enough to read from across the room, and this fit the bill. I love the retro look of it, and the color sets off the painting nicely.


And here's the bedroom as it stands now. There are still a few things I need to finish, but it's getting there. I've had some setbacks - mainly, I had to get a new comforter because I tried to wash our old one in our washer and although it washed up fine, it scorched in the dryer. Ugh. Lesson learned. Luckily I found this for super cheap at Target, and it matches the room better than our old one anyway. 
And here you can see the painting in relation to the rest of the room. It pulls in all the colors and makes everything a little more cohesive. Jamey came home after this and exclaimed "It feels like a bedroom now!" I guess it was about time. It only took me five months... BUT I guess perfection takes time, doesn't it? ;-)

Thursday, December 18, 2014

Be Our Guest!

I'm beginning to think inspiration and motivation only strikes me at certain times, usually when I'm super busy. Why is that? Why can't I be creative when I have absolutely nothing better to do? I just don't understand. Last week, I was lamenting the fact I haven't had a fun new project to work on in awhile, and this week, all I want to do is push everything else aside and work on our guest room. And eat Christmas cookies. 

But such is life. Gotta take advantage of the motivation when it strikes, I guess. I just realized that HOLY COW CHRISTMAS IS IN ONE WEEK and I have so much left to prepare! And although we aren't having family over to our house for the holidays, I feel compelled to finally put together an inviting guest room, just in case. You never know who might need a place to stay for the night. Or who might be coming to visit me for a week in January (spoiler: it's Liz and I'm sooooooo excited!) Anyway, one thing I loved about this house when we first saw it is that it has a finished basement with a family room, bedroom, and attached bathroom. Absolutely perfect for guests. When we moved in, however, we decided it was just easier to put the extra bed in one of the upstairs bedrooms, since nothing was really put together yet. Also the toilet downstairs needed to be fixed, so the room downstairs has been sitting sad and vacant for four months now. 

You know how one thing leads to another? See this is where everything gets complicated. I've been wanting to get my sewing machine back out and start sewing again, and actually open up my Etsy shop. I have ideas! I have fabric! I have finished projects! But there's still so much left to do, and I can't finish until I actually have a sewing room. I decided I want to put my sewing room upstairs for now, so it will be more easily accessible. So in order to do that, we had to move the guest room downstairs where it belongs. But in order to have a fully functioning bedroom, we need a working toilet, so I needless to say I have made several trips to Lowes and Home Depot this week. Last night, we finally bit the bullet, bought the right part for the job, and Jamey installed it. Problem solved. No more leaky toilet! Okay, enough rambling for now.

Here is our sad and dejected room after we moved the bed downstairs. That was a fun ordeal. We had to take it out the front door, through the garage, and into the basement because it wouldn't fit down the stairs otherwise. We don't have a headboard for this bed, so I decided to make do and hang curtains behind it. It actually turned out better than I thought it would.


We also moved this hutch in from the family room. I had hoped to have a dining room to put it in, but alas, our house doesn't have a formal dining room, so it will have to make do as storage. This hutch came all the way from Nebraska, and used to belong to my grandparents. I can still see this standing in their home, decorated with plates and fancy figurines. So even though I don't have a dining room, this baby will always have a place in my house because in a way it hold some of my childhood memories. I have a few ideas for how to arrange it, but for now, it's still void of decorations.


Here is the bed after hanging some curtains and making it up with fluffy pillows and cozy covers. What a difference. I have a night stand that will go on the left side, but I want to paint it before I can put it in. More on that project coming soon!


I wish I had taken a before picture of the bathroom, but it's easy enough to envision nothing but a toilet and a shower. The room kind of echoed. Now it's a tad bit more inviting. Still needs some rugs on the floor, but it's getting there. You can catch a glimpse of the lighthouse wallpaper border in the mirror - that will eventually go... Not really my theme. But I don't feel like scraping off wallpaper and repainting so that will wait for another day when I have nothing else I'd rather do.


I loved the look of this wire basket, so I decided to use it to hold extra toilet paper and wash rags. 


And this might be my favorite part. You know how you go on vacation and inevitably forget your toothbrush or shampoo and try to make do without them because you feel awkward asking someone to share their toiletries? I compiled an "Oops" kit with extra travel-sized necessities like shampoo and conditioner, facewash, shaving cream, toothpaste, etc. so if a guest forgets something, I've got it covered.


And that's all I have for now! Still a lot to do, but I'm making steady progress. Stay tuned!


Wednesday, October 22, 2014

Laundry Room Artwork - Loads of Fun

Today I made a trip to Hobby Lobby, because they were having a sale 50% off framed artwork. Typically I tend to think artwork is overpriced, so I try to come up with cheaper, DIY decorations for my walls (because let's face it, it's not like artwork does anything except look pretty.) But in this case, half off regular price makes it pretty affordable, and the last time I was at Hobby Lobby, I noticed they have some really cute stuff. I was hoping to find something for our still-empty bedroom walls, but instead I came away with some cute and fun laundry room signs. The white space above the washer and dryer was just waiting for some inspiration, and I think these frames jazz up the space quite a bit, and bring it all together. Laundry is such a dull chore, so I might as well have a fun space to do it in. 

I saw this sign a few weeks ago, and decided to see if it was still there today. Thankfully, it was. It perfectly describes my attitude towards laundry in a cheeky, sarcastic way. ;-)


I loved the fun herringbone pattern and bold colors of the bottom sign. It's got a classic vintage look that I like. The top frame was actually something I put together. The frame used to be teal and lived on my bedside table, but since redoing the bedroom colors, it no longer matched. So I spray painted it gold, intending to put it in the bedroom somewhere, but I think it fits better in this space. I printed out the clothes pin graphics and glued them to some leftover scrapbook paper, and voila! Finished. 


Here's the whole finished space. I love it when things start coming together and start feeling like a defined space. Amazing how just a little something on the walls can go a long way.


I think I'll call this room done! 
(For now, anyway. There's always room to tweak.)


Monday, October 13, 2014

Library Fun - Edible Book Contest

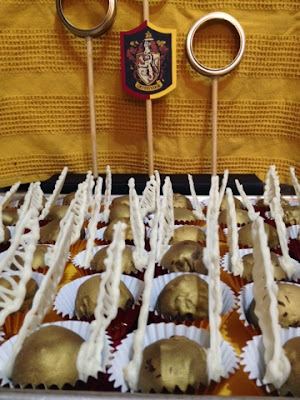
Today was Columbus Day, so my library system was closed and all the library employees met for Staff Day, an all day training event. To make the day more fun, everyone had an opportunity to enter a book-themed cake or dessert in the Edible Book Contest. I thought it sounded like fun, so I decided to make an entry - golden snitch peanut butter balls. Originally I was going to make cake balls, but I don't really like them, and they are a ton of work to make, so I thought peanut butter balls would be easier and tastier. Peanut butter and chocolate are the perfect complementary pair, in my opinion. Can't go wrong with that combination.

And they turned out great! They were still a lot of work though. I didn't get any prep pictures because I was too busy putting them together. Basically I made peanut butter balls, dipped them in chocolate, spray painted them with edible gold paint, piped out some wings with Wilton's candy melts, and stuck them to the sides. Unfortunately, some of the wings broke, and I didn't feel like making 100+ of them for my 48 peanut butter balls, so only about half of them had wings. I actually think it looked better that way. 

Here's my one and only picture of putting them together.


Jamey helped me make the Quidditch goal posts - mason jar rings glued to wooden dowels and set in a styrofoam block that I covered in black paper. You can't tell very well, but I covered the bottom of the pan in maroon and yellow stripes, and set the snitches in little gold paper cups. I also made a little Gryffindor crest to finish off the display. 


Closer...


Closer... I seriously had to resist eating them all in one sitting. 


Although these were really fun to make, I'm not sure if I would make them again. Peanut butter balls, yes. Any day. But the gold spray paint came off if you so much as touched it, and the wings kept falling off the sides due to the softness of the peanut butter filling. I was afraid they wouldn't survive the car ride. Thankfully, they all stayed together pretty well, with only a few wings coming loose. Unfortunately, as soon as I got there, one of the gold rings snapped off of the goal post, which is something I was afraid might happen but was unprepared for. With some quick thinking, I re-secured it to the post with some chewing gum, and it didn't budge the rest of the day. (Don't get grossed out... It was purely ornamental and wasn't touching the food at all. No germs. Promise.)

I had some pretty stiff competition though! My coworkers are an extremely creative bunch of librarians. And talented. Here are a few of the entries:

The woman who made this Hatchet cake said she had this cake in a box on her kitchen counter ready to go this morning, but one of her cats managed to jump up and knock it to the floor. She said it was a disaster, but she improvised very will with a hatchet and a small plane crash in the side, making the damage look intentional.


This one placed second. It had some truly amazing detail!


Charlie and the Chocolate Factory and Flip Flop


My entry, next to I Scream Ice Cream and Things Fall Apart - very clever. That cake was delicious, by the way.


Harold and the Purple Crayon, Pinkalicious cupcakes, and Plain Simple. The chocolate cake won third place.

A Case of the Stripes (super cool and won first place!) and Ashfall. I've never read Ashfall so I'm not sure of the literary reference there.


Alice in Wonderland and If You Give a Cat a Cupcake.


At the very end, there were cupcakes decorated like the Watchmen.


In all, there were 15 entries! I didn't place in the top 3, but that doesn't matter. I had a blast participating! Can't wait til next year!

Saturday, October 11, 2014

IKEA!

We went to IKEA today. Enough said. End of post. Amen.

Okay, not really. It would be impossible not to talk about all the wonderful vastness that is the planet of Ikea and all the things that it contains. I went there with a list and a plan, and came away with several unforeseen items... and a chocolate bar. They just jumped into my arms. Unfortunately, I wasn't able to get everything that caught my eye, but I got plenty of ideas, and those are always free!

But first I must premise this post with an honest opinion - I probably would not buy a ton of furniture at Ikea, because it all seems rather cheaply made to me and not very durable. I am NOT a fan of veneer particle board. That stuff NEVER holds up. And seriously - why would it? It's sawdust glued together and pasted over to look like real wood. It will never be real wood, no matter how much it wishes it was. However, there is still plenty to behold that looks expensive but is easy on the budget. Mainly all the decorations and things and stuff.


First up: Inspiration (aka things that I want)

Need this tiered cart with wheels. All of them. In all the colors! Why? I don't know. I have no idea what I would put in them, but surely I need a cart with wheels. I can figure out something to do with it. They come in pretty colors. That's enough reason. Putting it on my must have list for someday. At $49.99 these were a little bit over my impulse buy budget.


These hanging buckets. Cool! I seriously thought about buying three of the smaller containers to hang my silverware in, but I wasn't sure they would match my kitchen decor, or if they would even fit on the wall somewhere. Definitely an idea I'm putting on the list, once I figure out some more measurements. Plus, I might be able to find more options elsewhere. 


Here's another hanging basket. I really liked the industrial look of this metal bar.


I liked this night stand and thought it would go well in our bedroom. But again, it's $50 for particle board. Ew. But the esthetic is nice. I'm thinking I can find something similar and paint it the color I want.

I just about got these green metal boxes. Why? Again, I have no idea. They are cool. And came in a set of 3. Just need to figure out something to put in them.


I really love this lamp. The vintage industrial look of it is right up my alley. They also had one in gold that was tempting. 


A whole wall of perfect matching storage boxes, stacked in symmetrical harmony? Um, yes please. You know... to store all of those film photos no one develops any more. Or something.


What I Actually Got:

This little alarm clock was calling to me. It was just so cute I couldn't resist. And it was only $6 so why not? We need a clock for the bedroom anyway. Perfect for my bedside table. Although I doubt if it will get used as an alarm, since it would probably get tossed across the room and broken. No morning people in this house, folks.


Jamey really liked this old style wall clock, and we don't have one in the kitchen, so I'll probably find a place for it there. We will have no excuse for being late ever. 


Last but not least, I got one of these metal lace containers. It's supposed to be a planter, but since plants don't have a very long lifespan at my house, I will repurpose it for something else. Probably to hold pens and pencils. It is so adorable I wanted to get all of them. But I restrained myself and got one. I'm a good girl, I am. (I totally said that in the voice of Eliza Doolittle, but you wouldn't know that from reading it, would you? Sigh. Another classic movie quote that goes by unappreciated.)


And that, my friends, is the jist of our trip to Ikea. But a word of advice - if you plan a trip yourself, don't go on the weekend that Cirque de Soleil is in town, right down the street from Ikea. You WILL get stuck in traffic, and inevitably lose your mind. That's all, Folks! 


Wednesday, October 8, 2014

Motivation for Organization

I admit it. Keeping things tidy has never been easy for me. My mother tried to get me to make my bed every morning when I was growing up, and to this day, I probably only make it a handful of days out of the year. I mean, I'm just going to mess it up again every night, so what's the point of making it look nice it it's doomed to get ruined? 

But since moving out on my own and getting my own house, I have begun to see the wisdom in organization. No, I will probably never make my bed every day, but I feel much better about the state of my house when everything has a place. Or at least has the appearance of neatness. Organized chaos, I suppose. This week, I have noticed a few areas that really needed help. First, the laundry closet was full of random objects that have just been thrown in there because we need to keep them handy, but they don't have a specific spot. The bathroom counter is always in disarray, because I never put away the things I use every day. So I went hunting today in search of good bins, baskets, and organizational containers - preferably for cheap, since I can always upgrade later when I really have a system down.

Organizing the kitchen wasn't really on my to-do list, but I came across these adorable containers for 70% off at Michaels and I couldn't pass them up. I had storage containers for my flour and sugar, but they weren't fancy - just Oxo pop containers that didn't have any flair or character. So I was excited to find these perfect glass containers with the ideal amount of vintage detailing that is more reflective of my style and personality. They had a bunch of different kinds of jars that coordinated, so I got several of each kind to display. Recently I've been toying with the idea of taking the doors off two of the kitchen cabinets, and today, I decided to go ahead and try it out. I love it! It adds visual variety to the space and it's practical. It eliminates the hazard of the open door above the dishwasher that's always there to bash your head on when you're loading or unloading dishes. (Poor Jamey has fallen prey to it several times already.) It's also one less door to deal with in the awkward lefthand corner, when you're flipping them back and forth to get to different dishes. Plus it's easy access to dishes that we use often, and I finally get to display them!


Righthand cabinet.


Lefthand cabinet. Now I just need to figure out what to put in all my pretty jars.


Swapped out my flour and sugar containers for these. The detail on these jars hearkens back to the linear style of the 1930s and 40s.

Next: The laundry closet. I was excited about this closet when we moved in because it has a ton more shelving than our rental house did. And I can actually reach it! Well, most of it. We use this space to store laundry necessities as well as some tools, hardware, spare lightbulbs, and other miscellaneous supplies that we like to keep handy. I should have taken a "before" picture so you can see the drastic difference, but I'm sure you can imagine the chaos of having everything shoved in there with no rhyme or reason. It makes finding things very difficult. So I bought a bunch of these plastic containers at the dollar store and sorted the items for easy retrieval should we need them. It's a thousand times better. 

I also got these white baskets to store the hand towels and wash rags in, since they always tend to 
get pushed to the back or fall through the cracks.


Lastly, the bathroom counter. This space has always been a hazard zone for me. Just ask my parents. Hardly a day went by when they wouldn't complain about hair ties, bobby pins, earrings, and makeup strewn all over the sink. I'm guilty as charged. And some things never change. I hate the mess as much as anyone, but again it goes back to practicality. Why put things away when I need to use them every day? I thought about getting a shelf or a cabinet to put them in, but I really wanted to keep them handy. So I found this decorative bucket to put the bigger items in - contact solution, hairspray, deodorant, etc. and then I got smaller plastic containers for the little stuff. One for me, and one for Jamey to put his allergy medicine in. If it's not out in plain sight, he will forget to take it, so it's nice to have it handy as well. 

So neat and tidy!


I'm beginning to think there's a unique strategy for keeping a clean house. Cleaning schedules and checklists never work for us, no matter how much I've tried to keep to them. I'll do okay for a few days and then before I know it, everything is a mess again. Must be that Second Law of Thermodynamics. I'm think the easiest way to keep things clean is to set myself up for success by keeping things handy for when I need them, but sorted enough so I can find them. The more complicated the system, the harder it will be to follow. The last few weeks, I have finally found the perfect cleaning strategy - I call it the "10 Minute Pick-up." At the end of the day, Jamey and I will take around 10 minutes to straighten up the house - put the dishes in the dishwasher, wash the pots and pans (no more stinky dishes in the sink!!), sort the mail, put away shoes and personal belongings that were used that day, vacuum the rug, pick up the dog toys, etc. And it's been awesome! I no longer feel like it's my sole responsibility to keep the house tidy, since having someone to help makes things go faster. And it doesn't take hours to catch up and clean the mess that has accumulated over many busy weeks. And now that things are more organized, picking up will be easier, so it's a win-win situation.

On to the next project!